Tuesday 22 July 2014

Fernseher aus Berlin - Nr. 5

Well, I've been in Berlin for over three weeks now and I've already got too much too report... already falling behind with sharing my discoveries here.

I've collected five SCART TVs so far but I'm not going to start my Berlin with TV #1. Instead, I'll start where I'm currently working...

I picked up this (apparently) defective Loewe for it's tube only. This is a 100 Hz television and you're about to see why 100 Hz processing sucks dogs balls when it comes to retrogaming. However, the tubes used in the later model Loewes are stellar when combined with an older, analog chassis.

Before I gut this unit and chunk all but the tube, I figured I'd take the opportunity to show exactly why 100 Hz is so damn awful.

Before we get to the nasty stuff, here are some details on the unit in questions:

Loewe. Profil 3570 Z
100 Hz/Blackline
Chassis type: Q4400
Tube sticker
Tube type: A66EAK552X54
Also, I should mention that the collection of this SCART television was rather memorable. I turned up at Micheal's house (the eBay seller) with my hand cart, ready to cart this thing back on the subway. Instead, Michael loaded the TV, my trolley and myself into his car and drove me across Berlin back to my apartment. What an awesome guy!

Okay, now let my try to explain the worst that 100 Hz processing has to offer...

Red on Black

This is probably the most obvious place to start when going on a 100 Hz hate fest.

In the following example, I photographed the Taito logo from Rainbow Islands with 9 different color settings (i.e. the color balance setting in the TV's picture menu). I started with color at minimum (value of 0) and worked up to the maximum (value of 63) in steps of 8. As you'll see, the greater the color intensity, the greater the visual distortion of the Taito logo.

Note: I placed a small sticker on the glass of the tube and focused my camera at this point for each image. You can see the sticker stays in focus, assuring you that my camera wasn't simply out of focus in the later images.

Color = 00
Color = 07
Color = 15
Color = 23
Color = 31
Color = 39
Color = 47
Color = 55
Color = 63
Ouch! What a mess!

Now, did you notice how the white "CORPORATION" text stayed crisp while the red became over saturated and distorted? It took me a long time to realise that the artifacts created by by 100 Hz processing where exacerbated by the color balance setting. Later I discovered that the color balance on most SCART TVs doesn't have any effect on the incoming RGB signal. In my mind, this is a good thing. The signal passes untouched.

So, with the color set to a low value, the image is sharp and not too distorted. The problem is, of course, that then the image looks washed out and loses that classic CRT vibrancy.

When I first started out with an 80+ cm Loewe unit with a Q4400 it was very frustrating to see these artifacts. I thought maybe my my particular unit was defective or there was something wrong with my homemade VGA to SCART cable. As it was pointed out to me on a forum, the problem lies with the 100 Hz processing.

Further examples

Next, let's check out a random assortment of gruesome 100 Hz pixel murders, starting with a bunch of Rainbow Island examples:

Note the "Focus!" sticker... it's sharp! Also, white stays true.
Red on Black = Disaster
Everything is going wrong here...
Oh my... look at the ghosting!
Compare the clarity of the white text compared with the manic colors
Notice the random lines coming from the A and D characters?!
More icky red text
Check out the color distortion in the text!
Observe the distorted rainbow
Willow's title text suffering from 100 Hz processing
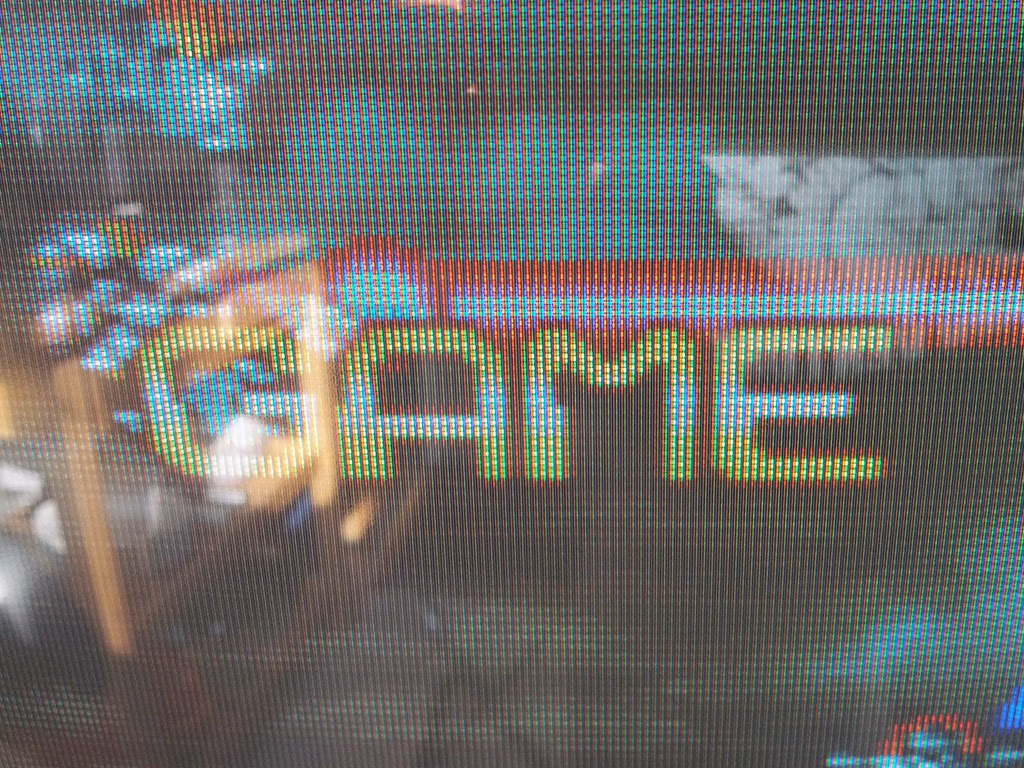
Check out the edges of the "Game Over" rectangle...
Street Fighter II loses its crispness
We could go on all night finding more disastrous examples of this kind of built-in image processing. It's a real shame because the focus, stability and overall clarity of this TV is amazing.

Conclusion

100 Hz. Don't do it! Unless the 100 Hz television your neighbor is giving away also has a VGA port (which would most likely bypass this digital processing debacle) or has a tube your want to plunder, say "thanks but no thanks". It's just not worth the disappointment.

And, it gets worse. The images I've shown are bad enough but seeing what this processing does to animation is just awful... I'll see if I can capture some video for a future installment.

Monday 21 July 2014

How to clean a 14 inch CRT, inside and out

I like my favorite things to be clean. When I find a new SCART television that I like, I try to restore the aesthetic condition to a new-ish state. Usually this just involves wiping down the outside casing and polishing the screen until I can no longer find a single greasy mark or hardened piece of fly vomit.

However, I've recently taken this cleanliness to the next level by messing around with rinsing the internal components. So far this has proven extremely effective in eliminating the chassis grime that builds up over years of domestic use and neglect.

I guess you could argue that cleaning a chassis makes it easier to service and allows components to cool properly because they’re no longer under a blanket of fluff but I just plain like how good the CRT looks internally when everything is spick and span.

As a demonstration, the following steps were taken to clean the insides of a neat little 37 cm Blaupunkt PM 37-43 television:

Right side
Left side
Model: PM 37-43 / Chassis: FM 241.00 (AKA Grundig CUC 6300)
Requirements:
  1. A dishwasher with a rinse cycle.

    Rinse cycle
  2. Generic washing detergent
  3. Soft bristle toothbrush
  4. Sponge
  5. Magic Eraser (or regional variant)
  6. Philips head screw driver
  7. 8 mm socket
  8. Socket extension
  9. Ratchet
  10. Empty jar
    Tools
  11. Dish drying rack

    Drying rack
  12. Some hot weather!

    The weather in Berlin
I like to cut the Magic Eraser into smaller, more manageable pieces before starting. I do the same with the sponge also:

Sponge and Magic Eraser pieces
Okay, let's get domestic!

Back cover:
  1. Lay the TV face down against protective surface (e.g a hand towel).

    Face down on a towel
  2. Remove the four screws from the back casing.
  3. Place the screws in a small jar for safe keeping. This menial step will save you much angst later on!

    Screws in jar
  4. Remove the back casing.

    Back cover removed
  5. Place the case in the bottom draw of a dishwasher.

    Back cover loaded into dishwasher
  6. Put the dishwasher on a rinse only cycle. Do not complete the full cycle as the intense heat of the drying stage will probably damage the plastic! The plastic used to make TVs isn't the same as the stuff your Tupperware lunch box is molded from.

    Rinse cycle complete
  7. Once the rinse cycle is complete, remove the back casing and place on the sink.

    Bath time!
  8. Check for any stubborn dirt or sticky marks. Clean these with a combination of dish washing detergent and a toothbrush, sponge or Magic Eraser. Use cold water only so as not to damage the plastic. Also, use the toothbrush and Magic Eraser blocks sparingly! They will leave scratch marks if you're not careful! Try to remove grime, dirt or paint marks using the sponge first and then move to a Magic Eraser if it won't budge. Use the smallest piece possible in order to focus on the affected area only and use a light, circular motion for the best effect.

    Detail cleaning
  9. Once satisfied that the case has been thoroughly cleaned, place it back in the dishwasher.
  10. Reset the rinse cycle and run the dishwasher again.
  11. After the second cycle has completed, place the back casing on a dish rack to dry.

    Back cover drying
  12. Once completely dry, wipe down any residual water marks.
Chassis:
  1. Disconnect the two green ribbon cables from the neck board and the main chassis. Place them in the top rack of the dishwasher.

    RGB ribbon cable
    Ribbon cable 2
  2. Disconnect and remove speaker cable. Place it on the top shelf of the dishwasher.

    Speaker cable
  3. Disconnect the white plug for the deflection cable that attaches to the yoke.

    Deflection cable
  4. Un-clip the neck board ground cable from the ground strap attached to the tube.

    Ground wire and ground strap
  5. Disconnect the anode cap (be careful to properly discharge the screen in the process).

    Anode cap
  6. Once the red flyback cable has been removed, unscrew the plastic lugs on the flyback.

    Flyback terminals
  7. Remove the red (screen) and blue (focus) wires from the flyback. Take note of which holes they belong to!
  8. Now, carefully remove the neck board from the tube. To do this safely, hold the front of the TV with one hand and carefully loosen the neckboard with the other hand. Place it on the top shelf of the dishwasher once removed.

    Neckboard
  9. Detach the grey and black degauss cable.

    Degauss cable
  10. Carefully slide the chassis out of the plastic case.
  11. Detach the green ribbon cable from the front remote board (i.e. the front panel control buttons).

    Remote board cable
  12. Detach the plastic guard that protects the mains section. Place this in the top shelf of the dishwasher.

    Plastic cage
  13. Any stickers attached to the chassis will probably come off during the wash cycle. Note down any important details (e.g. flyback model number).

    Grundig M*29201-028.53* flyback
  14. Now, place the main chassis in the bottom shelf of the dishwasher, facing down.

    Chassis, ready to wash!
  15. Complete one rinse cycle.
  16. Remove the each component and spot clean with a toothbrush, sponge or Magic Eraser.
  17. Pay particular attention the anode cable. The cap is usually very dirty (use a toothbrush here) and the red cable is usually filthy (use a Magic Eraser here).
  18. As you clean each component, place it back in the dishwasher.
  19. Complete the second cycle.
  20. Place all parts on a drying rack.

    Chassis and neckboard parts drying
Tube:
  1. Remove the speaker from the side slot inside the case.

    Single speaker
  2. Using the 8 mm socket, unscrew the bolts that fasten the tube to the case.

    Fastening bolt
    1. Put the bolts in the same jar as the four black screws.
    2. Carefully lift the tube out of the case.

      Tube (with degauss cable still fitted)
    3. Remove the degauss cable. Place it on the top shelf of the dishwasher.

      Tube (with degauss cable removed)
    4. Remove the ground strap.
    5. Place the degauss cable and ground strap in the top shelf of the dishwasher.
    6. Photograph any details on stickers that may be needed for later.

      Orion R370BV1BK1A-TC23
      A34JLL90X23
      A 34 JLL 90X23
    7. Carefully place the tube in the bottom shelf of the dishwasher.

      Tube loaded into dishwasher
    8. Complete the first rinse cycle.
    9. Clean the degauss cable with a toothbrush.
    10. Wipe down the tube with a sponge. Do not scrub off the grey aquadag painted onto the tube! That is essential for proper and safe operation.

      Carefully sponging the tube
    11. Use a Magic Eraser to thoroughly clean the glass face and edges of the tube.
    12. Place the degauss cable and tube back into the dishwasher.
    13. Complete the second rinse.
    14. Place the tube face down on a towel to dry.

      Tube drying on a towel
    Front case:
    1. Detach the green ribbon cable from the remote board.
    2. Unscrew the remote board.

      Remote board
      1. Place the front case in the bottom shelf of the dishwasher.
      2. Complete a rinse cycle.
      3. Spot clean any particularly dirty parts. Use a sponge to wipe out the inside of the casing.
      4. Rinse again.
      5. Place on drying rack.

        Front case drying
        Reassemble:
        1. Wait for all components to be bone dry!
        2. Re-assemble the television by reversing the steps.
        3. Pay special attention to the alignment of the tube in the front casing before screwing it into place.
        4. Double check all connections!

          Everything reconnected
          Ready for testing!
        Testing:
        1. Connect the TV to a power strip that has individually switched outlets. This way if something goes wrong you can quickly cut the power without having to go near the TV itself.
        2. Power up the television and hope for the best!

          Success! We have snow...
          All is well with an RGB source
          Close up
        Finished!

        Now, that the operation is complete, let's look back to how dirty this unit was to start with:

        Chassis
        Flyback
        Yoke
        And now compare the end result:

        Chassis and yoke
        Flyback
        Final thoughts...

        I understand that this process was fairly naive. There is a chance of ruining your TV or zapping yourself if you are careful.

        That said, it was interesting to see how a TV could be cleaned so thoroughly using a bunch of household products. The final result certainly looks great and the TV no longer smells like old cigarette smoke and dog fur.

        This process is not really suitable for a larger TV (unless you have access to a commercial dishwasher) but I guess a pressurized water could be handy for a bigger unit.

        Next time I'd like to try to over drying method described here.